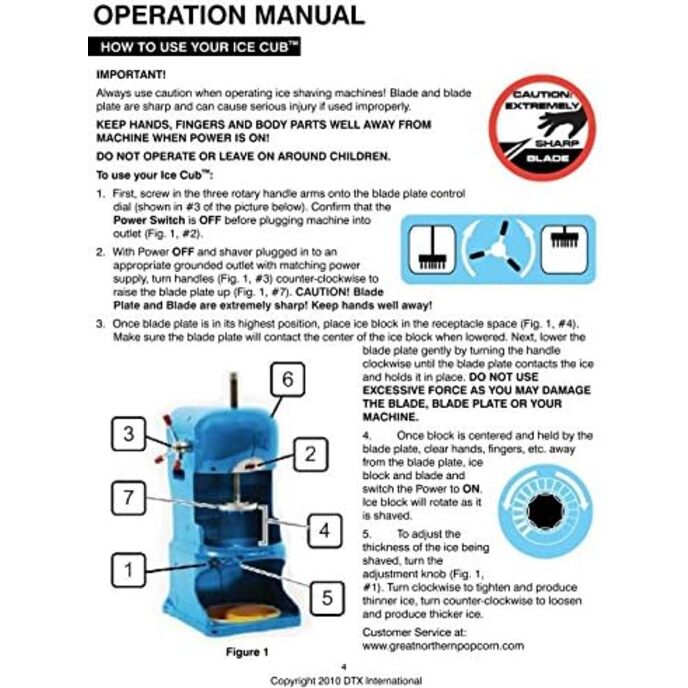
Throughout these reviews, a few small items keep popping up as drawbacks to an otherwise fine machine. It was with these concerns in mind that I unboxed, assembled, and adjusted the Ice Cub. I took pictures along the way, especially of the blade adjustment process. If there is a way to post them here, I'll do that. In the meantime, here is a "blow-by-blow" of the process and what I found: 1. Delivery: Delivery was one day early, which is why I'm sitting here typing this review instead of shaving ice. A+ 2. Condition of Package: Other reviewers are right - it comes in a box that is not of the highest quality. The box was, however, taped and banded. The machine was held in place with custom Styrofoam inserts and shredded paper and cardboard. Underneath all of that, he machine was wrapped in a tied-off thick plastic bag. A 3. Condition of Machine: With the exception of one small scuff, flawless. It might be of interest to some to know that the plastic housing is fairly sturdy. It is, however, plastic and not a scratch-resistant composite. With use, it IS going to collect scratches and scuffs. A product that helps hide these pretty well is Plexus - a spray that helps keep motorcycle windshields crystal clear, even after they've weathered. B+ 4. Grease: Lots of it, but only where it is supposed to be. The shaft that holds the lion's share of the grease came wrapped in a sheet of heavy paper which did a good job of not letting the grease all over everything else. A 5. Dirt: Very little at all on the plastic - a fine gray dust on the tops of some of the metal parts. That gray dust responded when I ran a magnet over it - it is (at least partly) metal dust. I don't think these are made in an ISO 9000 factory ;-) B+ 6. Components of Note: The blade table (on which the ice rests and spins) is made of brass. Other reviewers have described aluminum tables and complained of cracking ice from the heat transfer. Great Northern might have made a switch - perhaps for safety reasons (cracked ice blocks coming apart and flying off the table), for customer satisfaction, or perhaps for both. A+ 7. Blade adjustment: As delivered, the blade was grossly out of adjustment. While it was fairly even from side to side, it was set so high that even with the blade knob adjusted to its lowest setting the blade was so high that the ice probably would have caught and jammed. More on this a little later. F (Can be adjusted by user to achieve an A+) 8. Shaft Run Out: One reviewer mentioned that the shaft on his machine does not turn directly on center and the result is a machine that wobbles around and vibrates. The shaft on this machine turns true. I measured run out at the bottom of the shaft at .007 - a tolerance in keeping with fairly high quality machinery. A 9. Screws and Bolts: All present and accounted for and TIGHT! A+ 10. Sound: Quiet. A 11. Manual: Aside from the hazard warnings, useless. D- Going back to the blade adjustment - for the few people who have had noise, vibration, or halo halo and not snow, this might be an area to investigate and correct. The blade on this machine adjusts exactly like the blades on a woodworking jointer. One can spend a fortune on fancy jigs to bring that blade to within the thickness of a human hair of perfection from side to side, or one can use that money to buy syrup for one's ice! Here's how to do a good job of adjusting the blade: 1. Turn the adjusting knob to the right until the blade won't go any lower, Then back off 1 turn. (Note - the knob is rather small and does not provide much leverage. You really need to give it a good effort to get it turned all the way in before backing it off one turn. Don't be wimpy about it1) 2. With a 10MM wrench, loosen the two brass bolts that hold the blade in place. Get them just loose enough that the blade can be slid up and down in the bracket. they should NOT be so loose that the blade can flop back and forth in the bracket. If you get them this loose and then adjust the blade, when you tighten them the blade will invariably get higher than you want it to be when it is tightened down. 3. By hand, turn the blade adjusting screws counterclockwise until the blade is below the table. Note - it is the relationship of the edge of the blade and the table area to the left of the blade (as you are looking at the front of the machine) that is being described here. The pictures make this clear - I hope I can figure out how to post them. 4. Place a junk credit card on edge on the table to the left of the blade near the center hole of the table and slide the card over the slot until it overhangs the blade and the slot. SLOWLY turn the inside adjusting screw clockwise until the card just kisses the edge of the blade. (This would be picture 1) 5. Repeat step 4, but this time place the card near the outside edge of the table rather than near the center hole. You will know you have the right height on both sides when the edge of the credit card just catches the blade and leaves tiny powdery shavings behind. (This would be picture 2) 6. Lay the credit card flat across the blade to protect your fingers and gently tighten the blade bolts a little at a time (NOT the blade adjusting screws!) going from side to side several times until everything is good and tight. (This would be Picture 3). 7. If you have done this correctly, the blade should be dead flat and just a little above the left side of the table. Turn the adjusting knob all the way back in and the blade should be flat AND just below the surface of the left side of the table. This is where you want the blade to be when you center your block of ice on the table and start it spinning. 8. Back out the adjusting screws and put them somewhere handy until you sharpen your blade and need to use them again. 9. When it is time to shave ice, center your tempered block of ice (these are perfect for making your ice blocks - add 1/2 tsp. sea salt to minimize cracking:Extreme Freeze Reditainer 64 oz. Freezeable Deli Food Containers w/ Lids - Package of 8 - Food Storage ) lower the pawl onto the top of the ice sinking the teeth just a little, turn on the motor, and turn the adjusting knob gently to the left until the blade starts to shave the ice. The lower the blade (lightest shave) the finer the snow. This is as far as I can go since the ice is freezing and not yet frozen and ready to go. I'll supplement this review as warranted. All in all, this is a sturdy machine that, like a lot of Taiwanese woodworking machinery, will go on and on and on - quietly and humbly doing a good job of what it was made to do. This is an "A" purchase - very glad I bought it. I have little doubt that the snow it will make tomorrow and into the future will be of fine quality. One last note - SIZE. It IS big. If it were a machinosaur, it could eat 4 Little Snowie's and not stop to burp. That's in the photos too - would be picture 4 - I hope I can post them. All the best, Jim OK! We've used this a few times and couldn't be happier with it. We have named it "Snowasaurus" and it will make its public "debut" at the spring picnic at our all-girls high school. The snow is light, fluffy, and creamy. It melts in your mouth pretty much before you can do much chewing at all. There is ZERO crunch. It works fast. Cleanup is a quick wipe down with a clean damp rag. What a TON of FUN! Awesome purchase. Update August 3, 2014. Well, in response to Mary who has tried using my directions for blade adjustment, I have altered the text just a little. Mary, I hope you find the revised instructions more useful and that you will soon be enjoying shave ice! In the meantime, does anyone know how to post pictures with these reviews? Update August 27, 2014. Still no way to post pics - is it possible? How to? Mary, I've created a package of the 4 pictures that I will gladly email to you. Or did I do that already? I'm old and I forget.