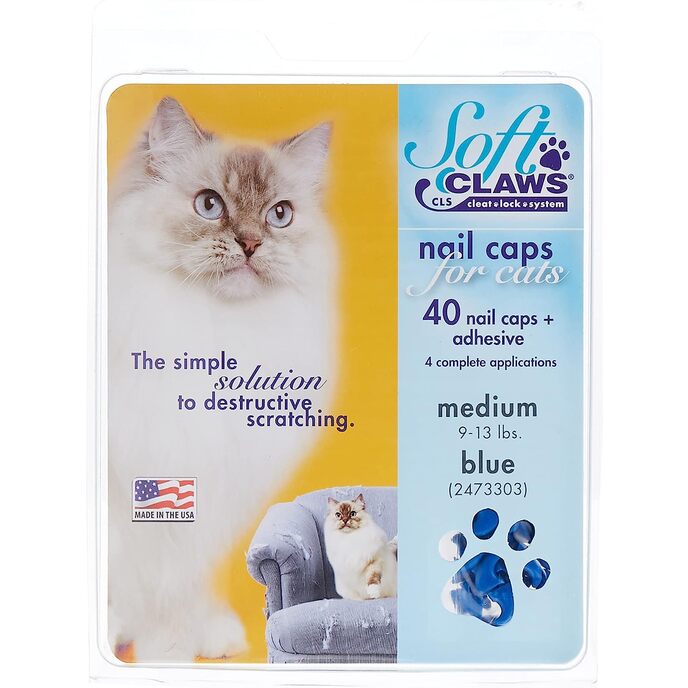
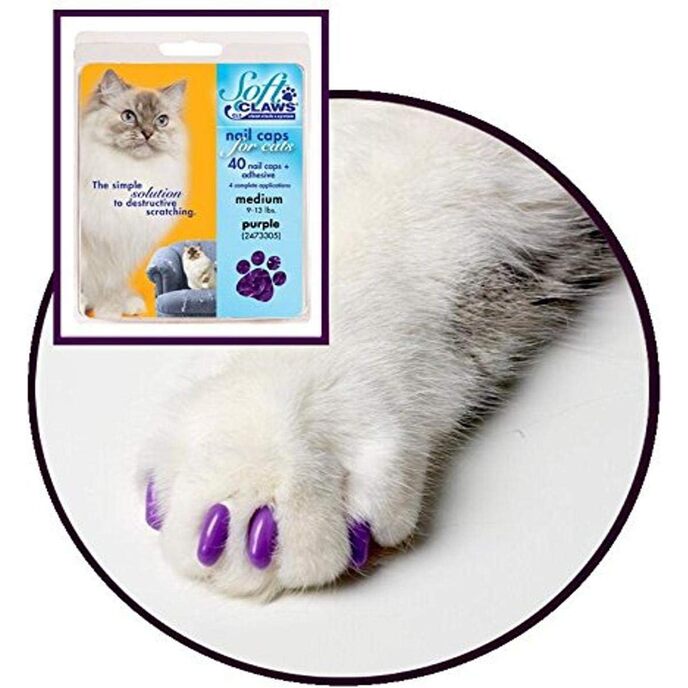
Others have already stated much of what I have to say, so I'll just leave a few tips based on my first experience putting these on. (Note: I have two 9-month-old kittens, one around 8 pounds, the other around 9.5 pounds. The medium size fits both of them well.) 1. Before I bought these caps, I was afraid they would prevent the claws from retracting. What I discovered with research (but didn't fully believe until I saw it for myself) is that nearly all of a retracted claw still sits outside the end of the toe -- it's just covered with fur, so it seems like the claw has been completely withdrawn. The edge of a properly fitted cap rests an eyelash above the surface of the skin when the claw is retracted. 2. For the first minute after the caps were put on, the smaller kitten completely ignored them and walked around as if nothing had changed. The larger kitten shook his paws a good bit and began biting at the caps, so my husband had to monitor him. 3. Once all the front caps were installed, I distracted them with a laser pointer while the glue set. I let them go after it on a linoleum floor, where they wouldn't get snagged (if anything, they were pushing the caps the direction the needed to go). The monsters attacked with their usual gusto, and it helped desensitize them to their new caps. 4. I put the very first cap on a little crooked, and the kitten later got its teeth behind the edge of the cap and worked it most of the way off. The glue is stronger than I would have believed, though, because she got it only about halfway off before falling asleep. I removed it with nail scissors. 5. If you have someone else hold the cat, you stand a better chance of extending the claw completely and thus getting the cap on without gluing any fur. 6. Filling the cap to the rim with glue is overkill -- you'll just get glue on your fingers when the nail pushes out the excess. A test that seemed to get us to a happy medium: Put in a bit of glue, then squeeze the flat sides of the cap together. If no glue rises to the surface, you don't have enough in there. If a little drop can be squeezed up without falling out, it's about right. If it's overflowing, drip the excess onto a paper towel. 7. If the nail sticks to your finger as you're installing it, de-stick yourself in the direction you want the cap to go. If you try to pull your finger the other way, it'll just take the cap with it. 8. If you do glue a little fur and the cat finds it uncomfortable, manicure scissors may help you safely cut the fur loose -- just be careful not to stab or nip the toe! 9. I removed the fine tip and blew into the large end to try to clear the glue before it dried. Then I nipped of a wee bit of the tip and tested to see if the air could flow through. Don't know whether I can reuse this tip later, but I figured I might as well give it a shot. Good luck! ***UPDATE: After several days, the caps are still in place and the kittens are comfortable with them. I worried that I was taking away their ability to stretch (in the way that declawed cats can no longer latch on to a surface and stretch backward), but they can still grab hold of the berber carpet and get a good pull. The plastic caps do make a faint tapping noise when the kittens walk on the hard floor, but it isn't loud enough to bother us; however, if you're super-sensitive to noises like that, you might want to try another option.